
Automations
Build automated email workflows (welcome sequences, course drips, Resource delivery, tag-based flows): triggers, Send email / Wait / Conditional / tag and field steps, the Add, Settings and Analytics tabs, author and send schedule, test sends, activating and pausing, the delivery log and resend, why automation emails pause (review, card on file, plan limits), and plan limits.
What are automations?
Automations are email workflows that run in the background. Set one up once, and it sends emails, waits, branches on what each subscriber did, and updates their tags or fields as they go.
Common use cases
Welcome sequence
A series of welcome emails when someone subscribes. Set expectations and share your best work.
Course drip
Deliver a multi-day or multi-week course one lesson at a time.
Resource follow-up
A short sequence after someone signs up through a specific Resource, form, or landing page.
Tag-based flows
Start a flow the moment a tag is added, like customer or re-engage, and stop it when the tag comes off.
Creating an automation
Start a new automation
In the sidebar, click Automations, then New automation.
Name it
Type a name in the top bar, for example "Welcome Series" or "Free Guide Delivery".
Set a trigger
Click the trigger at the top of the canvas and choose what starts the automation. See Triggers.
Add steps
From the Add tab, add emails, waits, conditions, and tag or field changes in the order they should run. See Steps.
Confirm who it sends as
Nashra sets the author to you. Open the Settings tab if a teammate should be the sender instead. See Sending identity.
Test and activate
Send yourself a test from any email step, then click Activate. New subscribers who match the trigger flow through automatically.
A new automation stays an unsaved draft until you name it, set a trigger, or add a step. Whichever happens first saves it. Leave before that and nothing is left behind in your list.
Start from a Resource
You can also start from the Resource itself. Open the Resource, open its After signup panel, and click Create an automation. The builder opens with the trigger already set to people who subscribe through that Resource, and a suggested name ("Resource title (Automation)"). If the Resource already has an automation, the link reads View automation and takes you straight to it. See Resources.
The builder
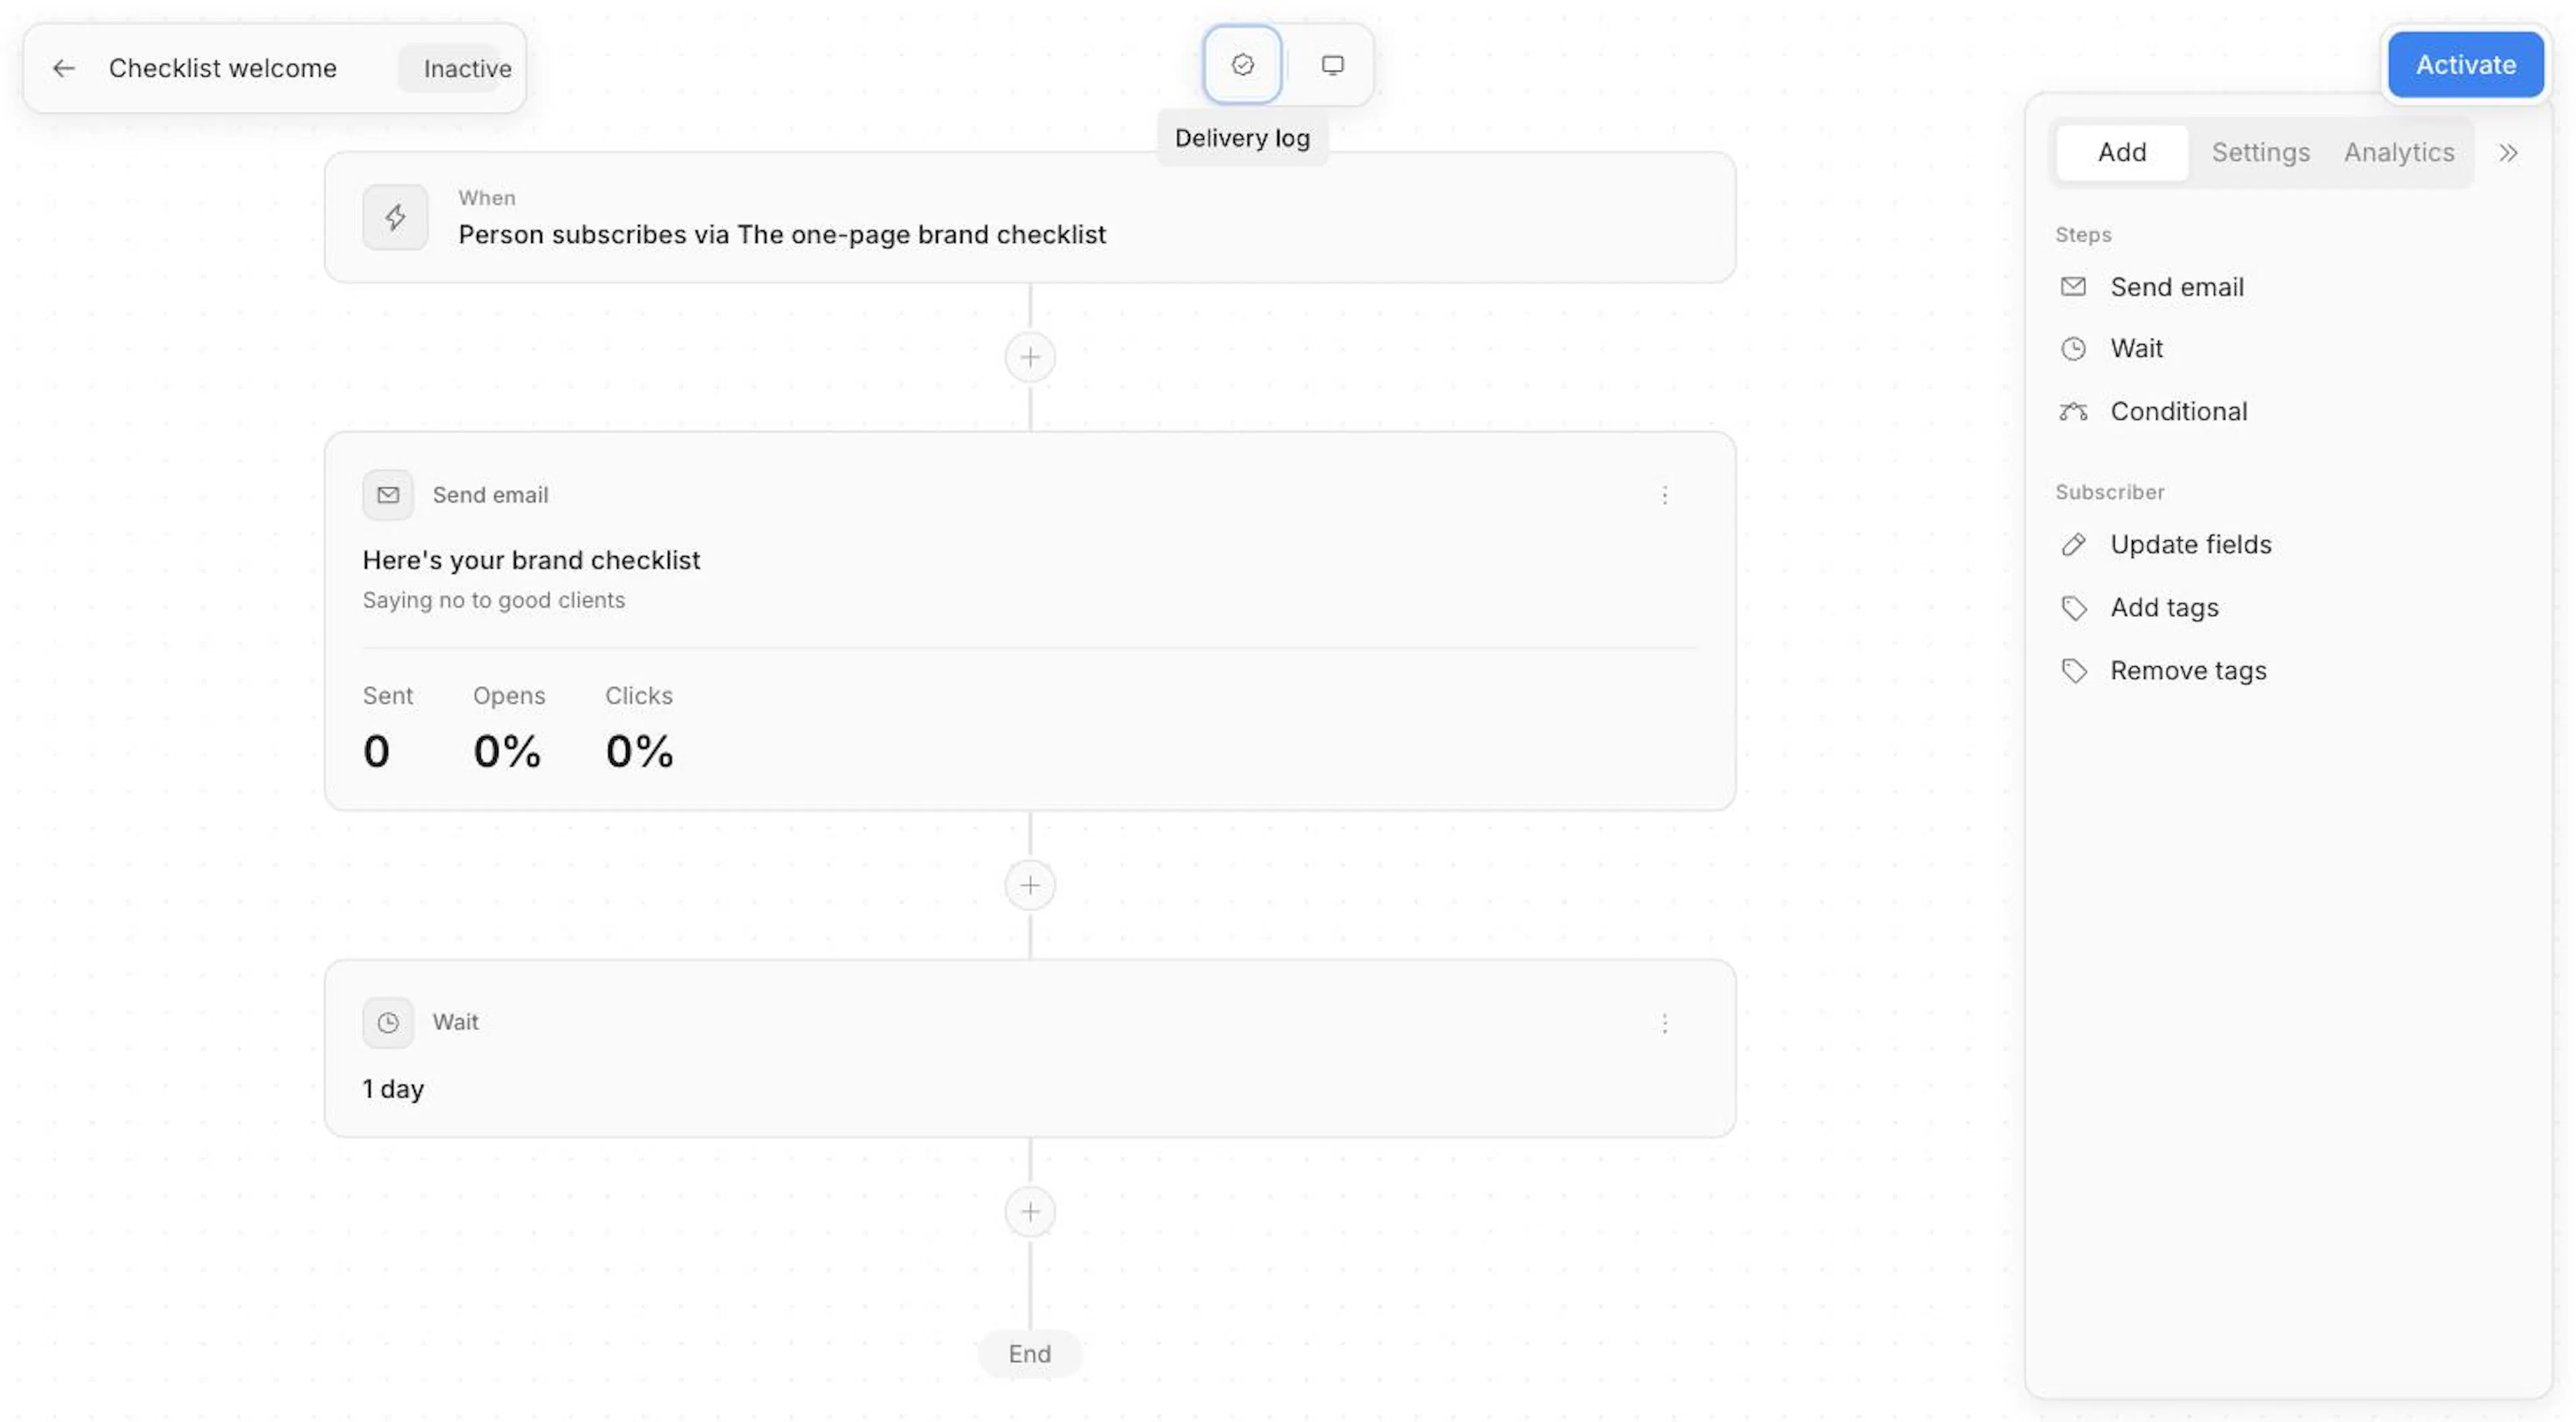
The top bar holds the automation's name, its status (Active or Inactive), the Delivery log, and the Activate / Pause button.
The panel beside the canvas has three tabs:
- Add. The steps you can add, in two groups. Steps: Send email, Wait, Conditional. Subscriber: Update fields, Add tags, Remove tags.
- Settings. The Author (see Sending identity), an optional send schedule, and Repeat.
- Analytics. Subscribers in progress and completed, open and click rate, messages sent, the number of email steps, and when the automation last ran. It's empty until subscribers start moving through.
Each email step on the canvas also shows its own sent count, open rate, and click rate.
Triggers
Every automation starts with exactly one trigger. Pick Person subscribes and then a source, or one of the two tag events. Nashra names the trigger for you based on what you choose:
| You pick | Trigger name |
|---|---|
| Any source | Anyone subscribes (any source) |
| Website | Person subscribes via Website |
| Signup form (an HTML form) | Person subscribes via form name |
| Landing page | Person subscribes via page name (Landing page) |
| Hub subscribe form | Person subscribes via Hub |
| Resource | Person subscribes via resource name |
| Import | Person subscribes via Import |
| API | Person subscribes via API, or via API: key name when scoped to one API key |
Two more triggers skip the subscribe event entirely: Tag is added and Tag is removed, each scoped to one existing tag.
Segments aren't triggers. To run a workflow for a group, tag them and use Tag is added.
A landing page's Signup section, and a Booking section set to Ask for email first, make the page a subscribe source of its own, so you can scope a trigger to just that page. Publish the page first. See Landing Pages.
If the Resource you pick already emails a post on signup, Nashra warns you: your automation's first email would go out at the same moment. Add a Wait before it if you want them spaced out.
Automations remember tags by name, and Nashra keeps them in sync. Rename a tag and every trigger, condition, and tag step that uses it picks up the new name. You can't delete a tag an automation still uses. Nashra names the automations to update first. See Tags.
Steps
| Step | What it does |
|---|---|
| Send email | Sends one email: a subject, an optional preheader, and a draft post as the content. Pick one of your Recent drafts or click Create new draft |
| Wait | Pauses before the next step, in Minutes, Hours, Days, Weekdays, Weeks, or Months |
| Conditional | Splits the flow into Yes and No branches: has tag / doesn't have tag, opened email / didn't open email, clicked email / didn't click email, or field matches / field doesn't match |
| Add tags | Applies one or more tags |
| Remove tags | Removes one or more tags |
| Update fields | Sets one or more custom field values |
For "opened" and "clicked" conditions you also set a Time window, measured from when that email was sent. For example: clicked the welcome email within 2 days.
A Conditional always ends the flow it sits in. Everything after it lives inside its Yes and No branches, and each branch can hold its own steps, including another Conditional. Drag any step to reorder it, or use its menu to Edit, Duplicate, or Delete it.
A step marked Needs setup has to be finished before the automation can start. A Send email step with no draft attached counts. Activate is refused and names the empty step, and an empty step never sends a blank email.
Editing a running automation
You can't edit an automation while it's active. Click Pause, make your changes, then Activate again.
A welcome-series example
A simple automation covers most onboarding needs: one trigger and three steps.
- Trigger: Anyone subscribes (any source)
- Send email: your welcome message, sent immediately
- Wait: 2 days
- Send email: a follow-up pointing to your best posts, or a quick "reply and say hi"
Want the second email to differ for people who already clicked something in the first? Add a Conditional later.
Sending identity
An automation sends under one identity for its whole run. There's no per-step "from" picker. Nashra sets the Author to whoever creates the automation. Reassign it to any team member from the Settings tab, and every Send email step follows, including ones inside a Conditional's branches.
An automation without an author can't send. A test send stops and asks you to set one first, and live sends need an author too. The options are the sending identities set up under Team. Each member needs their own before they can be picked here.
Test emails go only to your own address, a team member, or one of your sender addresses.
Send schedule
By default, emails go out as soon as a subscriber reaches the step. In the Settings tab you can limit sending to certain days of the week and a start time. Emails then go out on those days, in a 30-minute window from that time, in your workspace's time zone. Anything due outside the window waits for the next one. The schedule applies to every email step in the automation.
Repeat lets subscribers go through the automation more than once. It's off by default. Most automations should run once per person.
Delivery log
Click Delivery log in the top bar to see every email the automation has sent, from every step, with the email each row came from:
| Shows | Details |
|---|---|
| Recipient | Their email address |
| The subject of the step it came from | |
| Status | Delivered, Queued, Bounced, Failed, Marked spam, or Suppressed |
| Engagement | Whether they opened and clicked |
| Failure reason | Hover a Failed status to see why |
| When | How long ago it went out |
Search by email, and sort by Newest first, Oldest first, Status — issues first, or Recipient — A to Z. Load more brings in older rows.
Resend on any row creates a brand-new send to that person rather than changing the original, so the log keeps its full history. Resends follow the same rules as automated sends. They're refused while the email is under review, while your account is past due or over its plan limits, or if a free workspace has no card on file.
Managing automations
The Automations page lists every workflow with its status and counts. From a row's menu you can Edit or Delete it.
- Pause (in the builder) stops the automation. No one new enters, and subscribers already in it wait at their current step. Activate again and they carry on.
- Delete removes the workflow entirely. Subscribers mid-flow stop where they are.
When automation emails pause
Sometimes Nashra holds automation emails. A banner on the Automations page and in the builder says why. Nothing is lost: held emails stay queued and go out on their own once the cause is fixed.
| Banner | What to do |
|---|---|
| Automation emails are paused while your account is reviewed | Nothing. New senders get a quick one-time check. You'll get an email when it's approved, and Activate unlocks then |
| Add a card to use automations — you won't be charged | Free workspaces need a card on file (or a paid plan) to activate and send automations. It confirms you're a real sender. Nothing is charged and your plan doesn't change |
| Payment past due | Update your payment method in Plan & billing |
| Monthly send limit reached | Upgrade now, or wait for your quota to reset next month |
| Subscriber limit exceeded | Your list has outgrown your plan. Upgrade to resume |
Only the workspace owner and full-access members see the Plan & billing link. Everyone else is asked to contact the owner.
Automation emails also go through the same content check as your posts. An email that looks like phishing or cold outreach is held for review.
A Resource's own follow-up email (the post it sends right after signup) works the same way. If one is skipped because your workspace was over its limits or had no card, it's sent automatically once you upgrade or add a card. The workspace owner gets one email explaining the pause. Follow-up emails count toward your monthly send limit.
Automation limits
| Plan | Automations |
|---|---|
| Free | 2 |
| Newsletter | 5 |
| Publisher | Unlimited |
See Plans & Billing for the full comparison. To decide who an automation reaches, build your tags on the Audience page first.