Publishing Posts
How to publish a post to your Publishing Home and keep it up to date — the Publish popover (title, URL, Published or Unlisted, thumbnail, publish date), what Unlisted hides, the status pill, Update and Move to draft, how Publish relates to Send email, automations that send a post, and the Share on social media window (Instagram story or carousel, LinkedIn, X, Threads, Facebook, WhatsApp, Draft with AI, posting from your phone).
Two actions: Publish and Send email
Every post can go out two ways, and the post editor's top bar has one button for each:
- Publish puts the post on your Publishing Home at its own URL.
- Send email delivers it to your subscribers' inboxes.
They're independent. Publishing never sends an email, and sending never publishes. Do one, the other, or both, in any order. This page covers Publish; see Sending Newsletters for Send email.
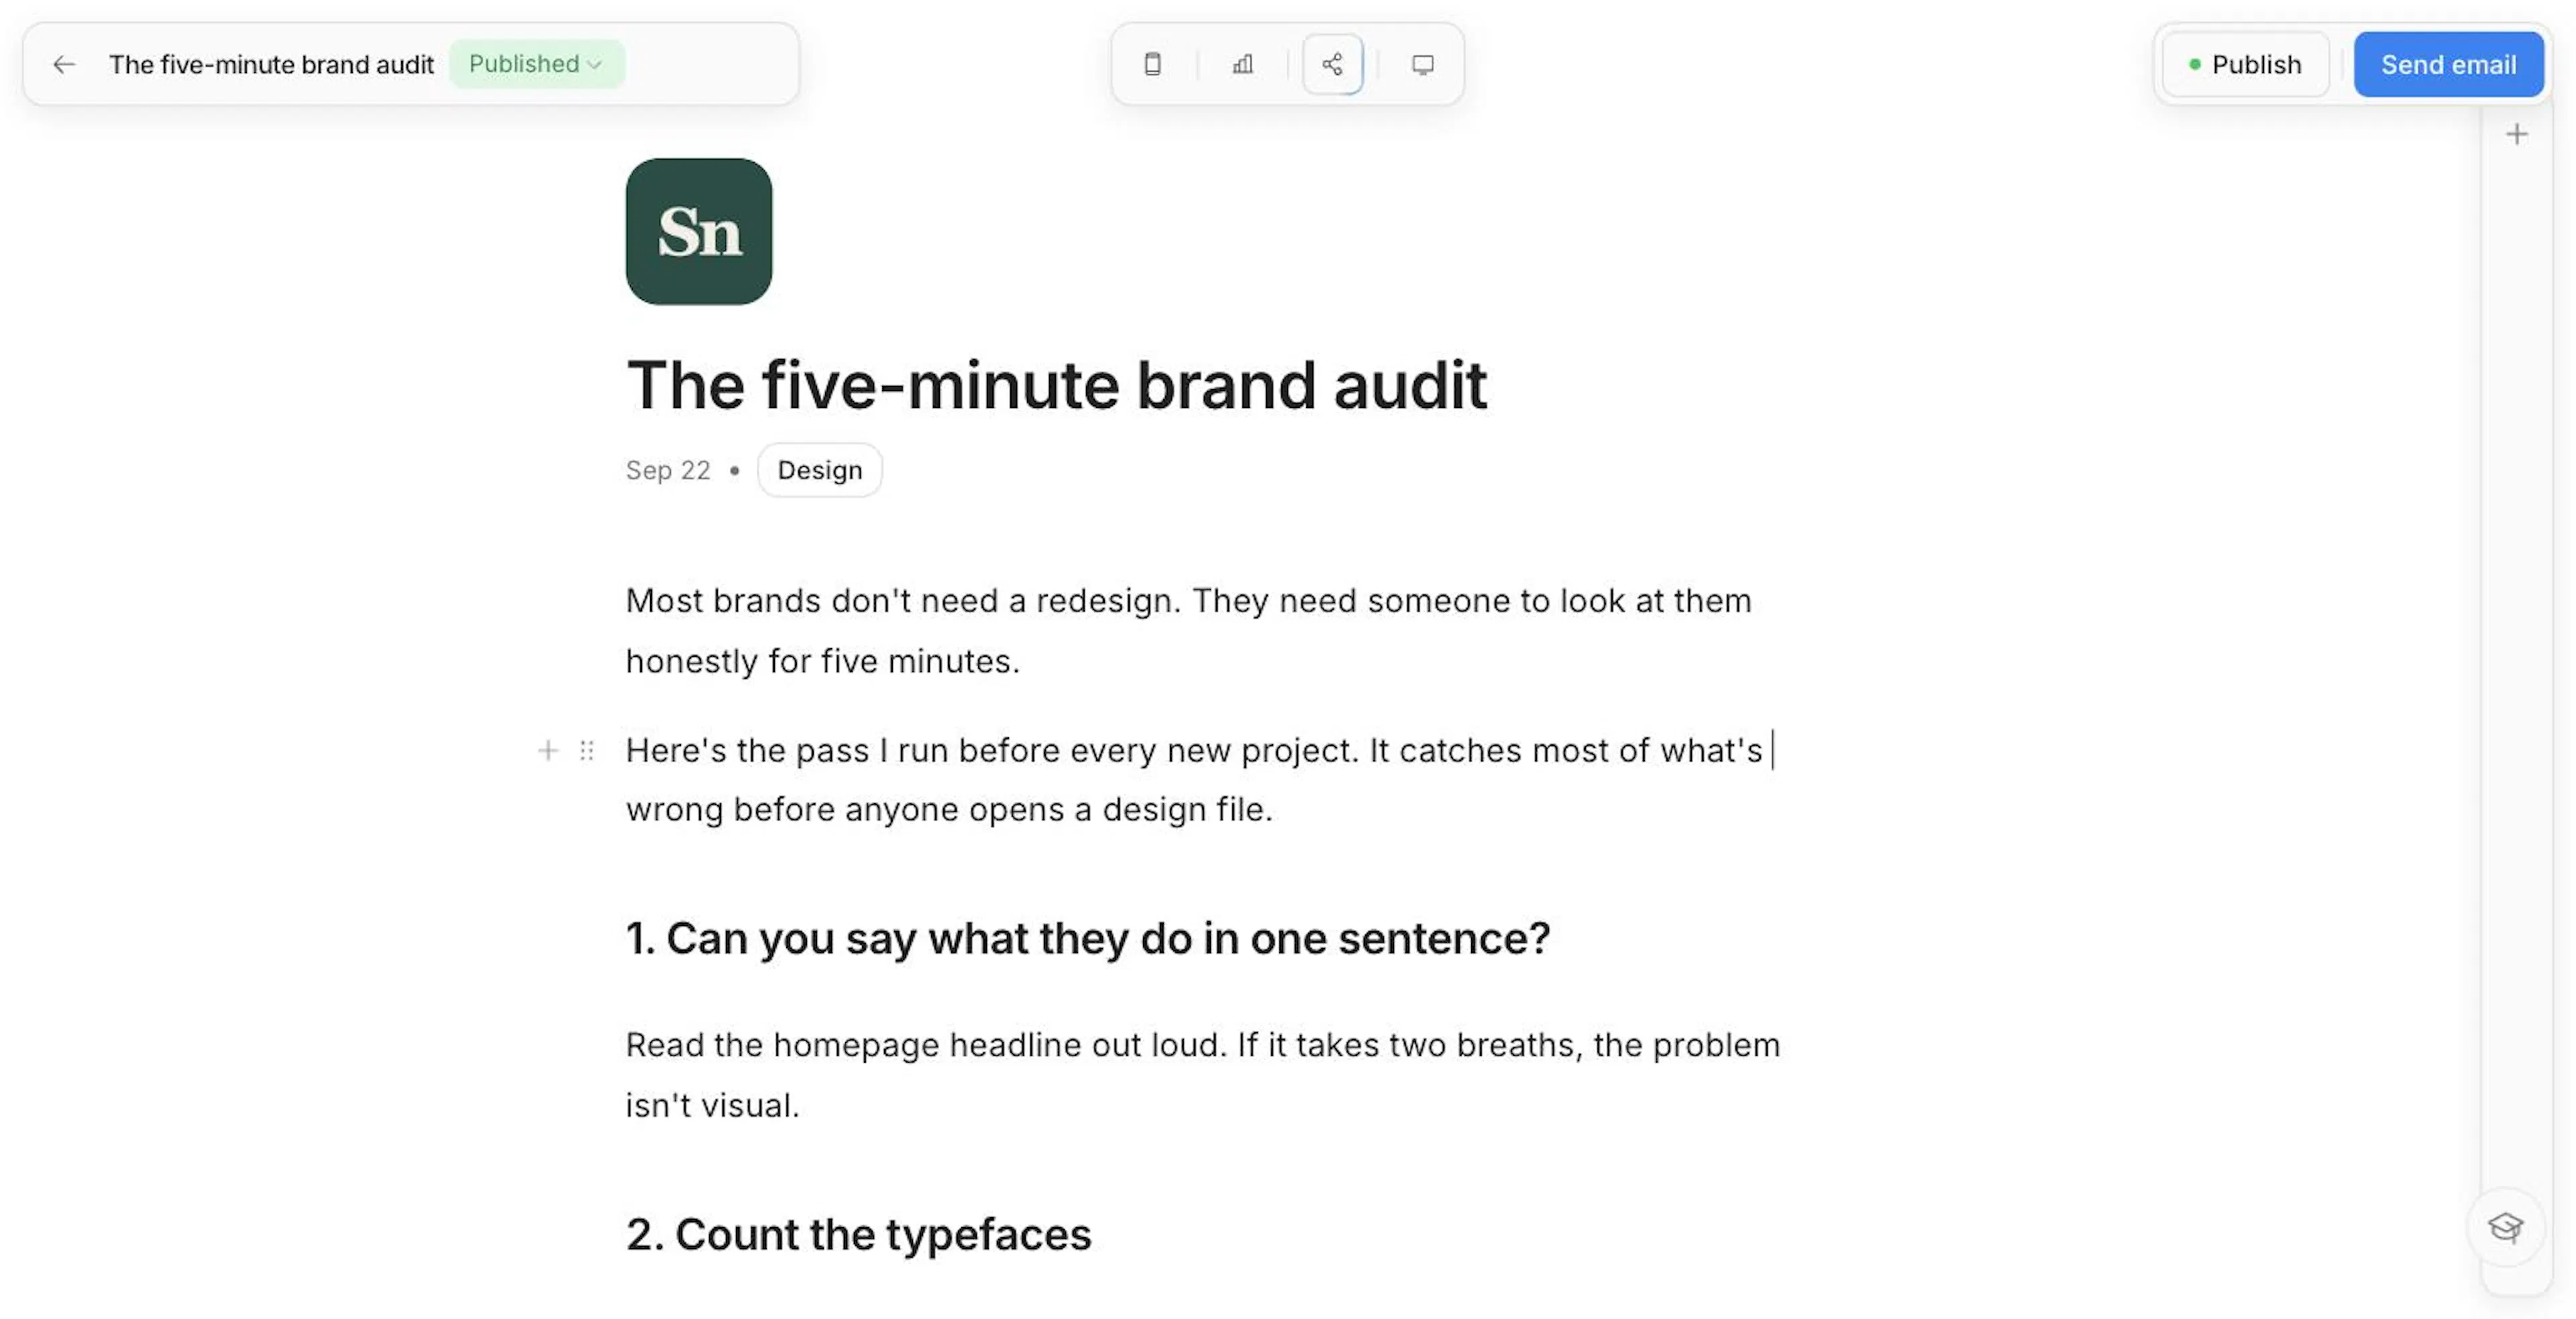
The rest of the top bar tells you where the post stands:
| Where | What it shows |
|---|---|
| Beside the post's name | The status pill — Draft, Published, or Unlisted — plus a Sent or Scheduled badge once there's an email, and a chip for any automation that sends this post |
| Center | Version history (see Version history), Mobile preview (on larger screens), Analytics (once the post is published or sent), and Share on social media |
| Right | Publish (with a small green dot while the post is live) and Send email |
Publishing to your Publishing Home
Click Publish
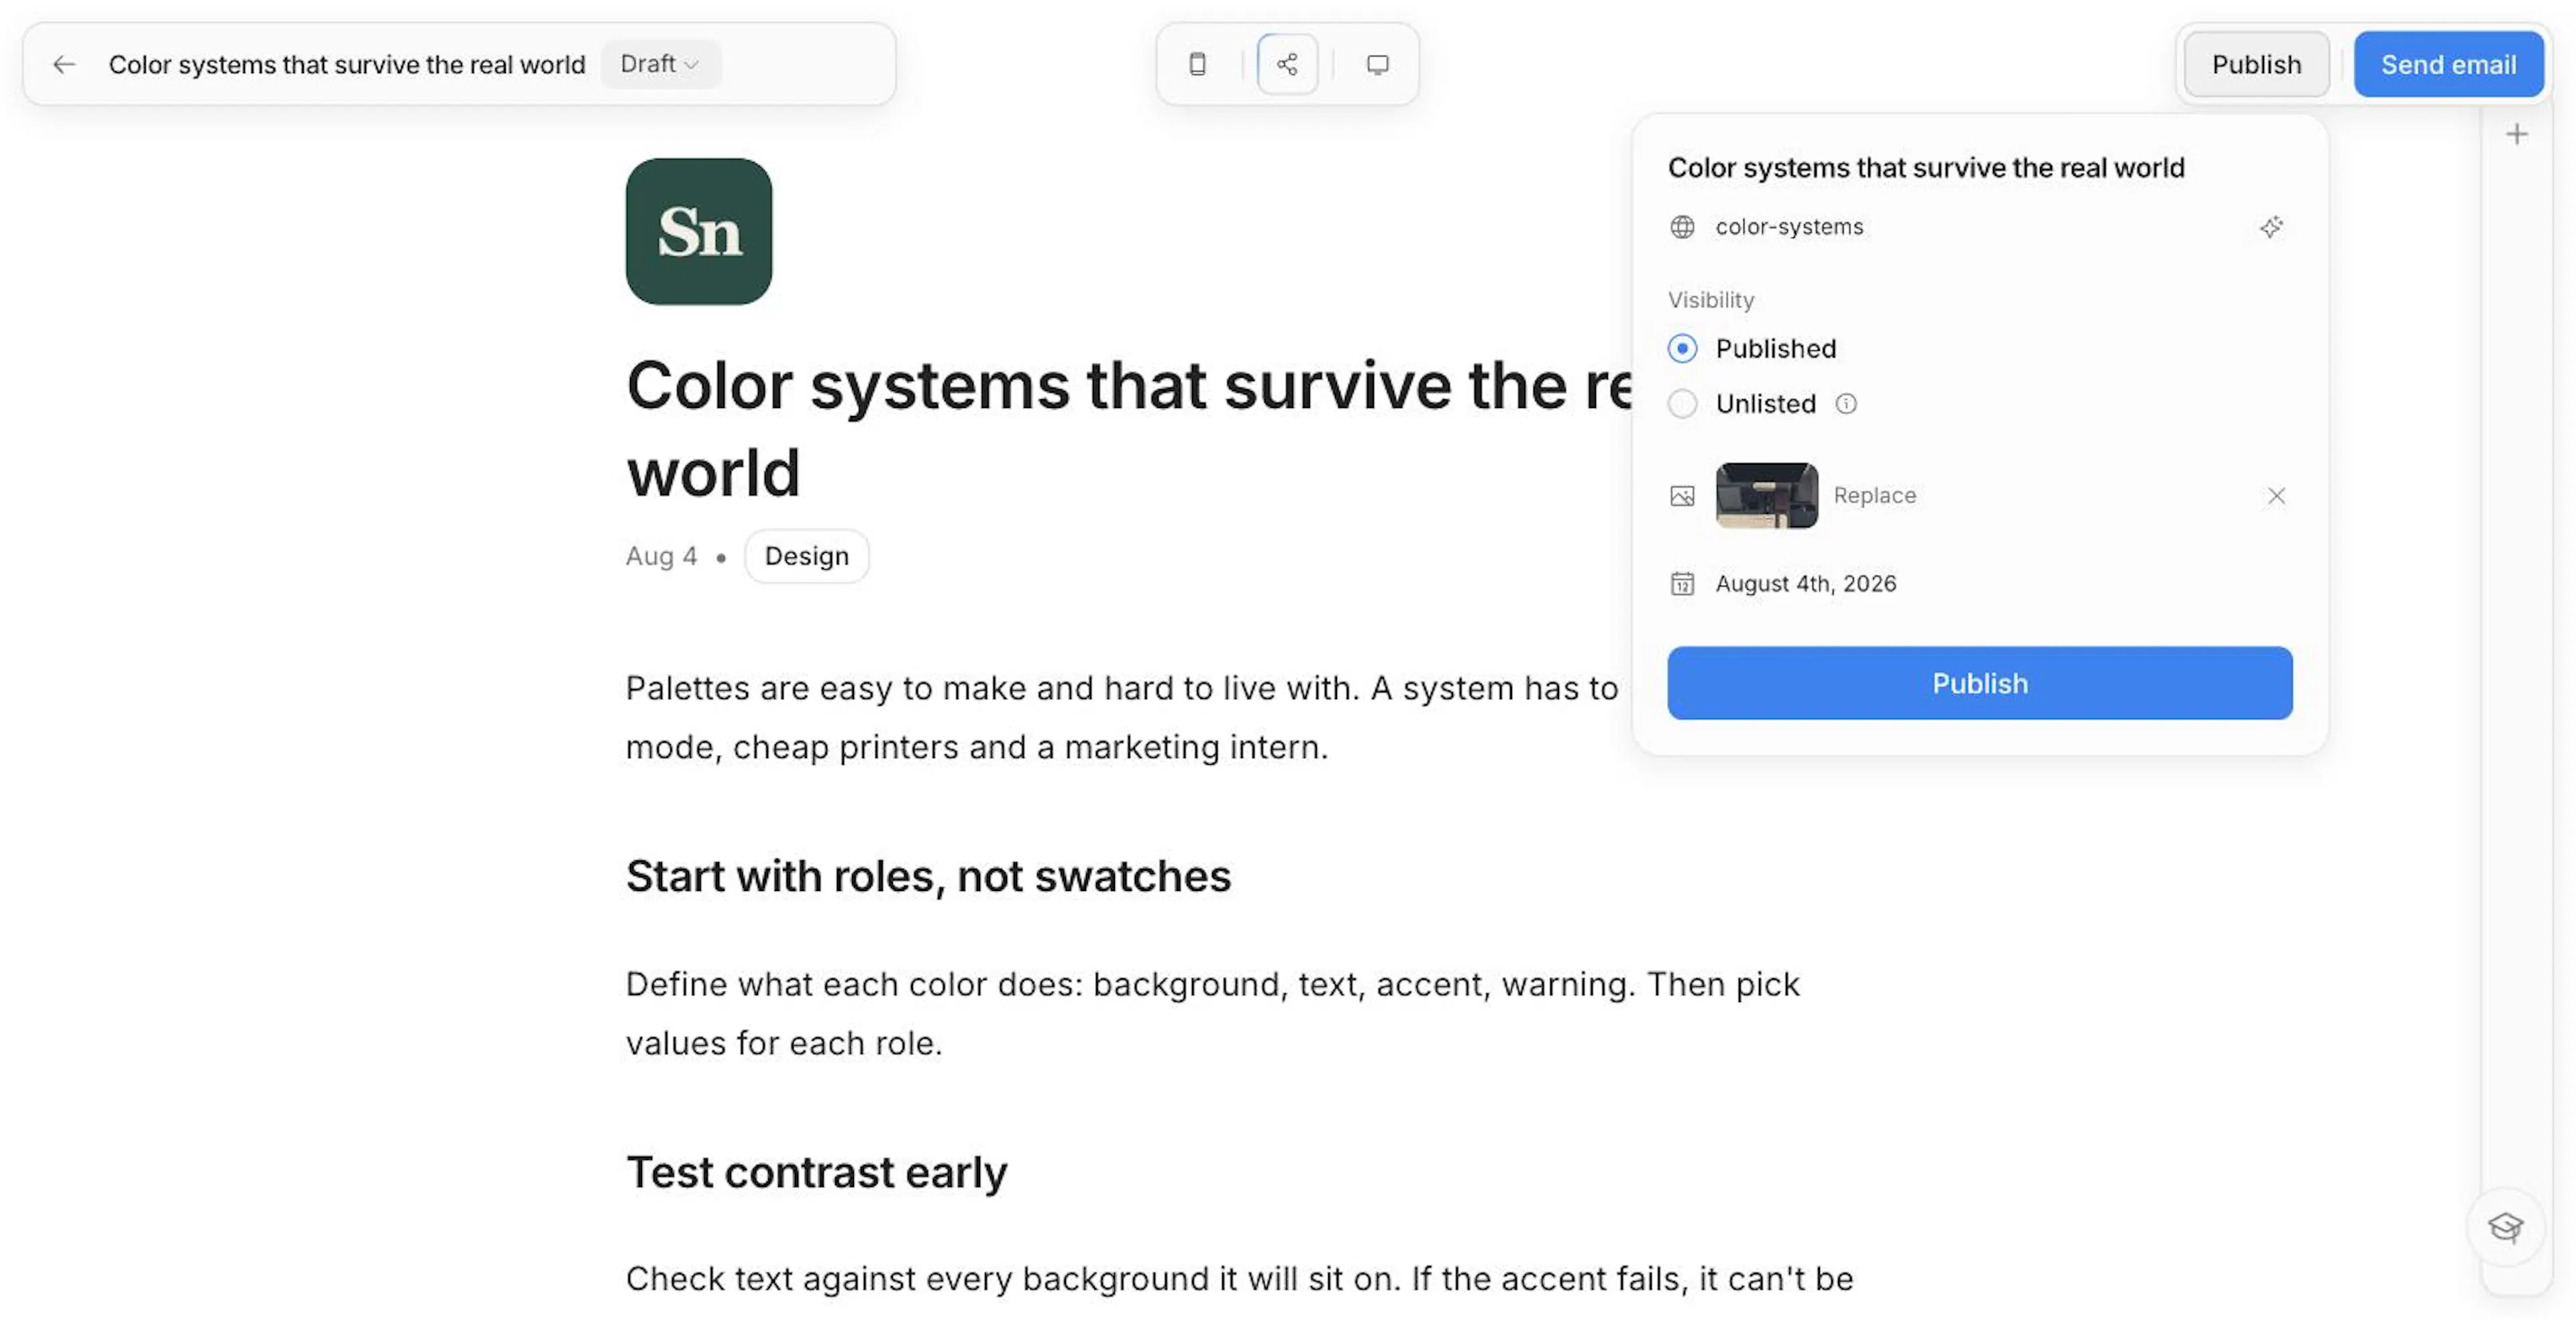
Publish opens a small popover. The post needs a title first, and your account email needs to be verified.
Check the title and URL
The title comes from your post's heading. The URL slug sits right below it and fills in from the title as you type. Arabic titles get a clean English slug. Click the sparkle to Regenerate slug with AI, or type your own using lowercase letters, numbers, and hyphens. Posts live at yourname.nashra.website/your-slug, or on your own domain if you've connected one.
Choose Published or Unlisted
Published lists the post on your Hub. Unlisted keeps it off every list, so only people with the link can open it. See Published vs. Unlisted.
Set a thumbnail
Nashra picks one for you: the first image in your post. If the post has no image, it uses the still from the first video (YouTube, Loom, or Vimeo) or a podcast episode's cover art. Click Replace to upload your own, pick a stock photo, or paste an image URL. A thumbnail you choose stays put through later edits. Remove it to go back to the automatic one.
Set the publish date
This is the date shown on the post. Back-date it or move it forward to control where it sits in your archive. It doesn't delay anything: the post goes live the moment you click Publish.
Publish
Click Publish. A Your post is live message confirms it, with a row of networks to share it on.
Publishing works on every plan, including Free. Posts publish on your .nashra.website subdomain with the Nashra badge. The Publisher plan adds your own website domain and removes branding from the web. See Plans & Billing.
If your post @-mentions another publisher, publishing is what notifies them. Drafts never do. See Mentioning other publishers.
Published vs. Unlisted
Both are live, and both open at the post's URL. The difference is whether readers can find the post on their own.
| Published | Unlisted | |
|---|---|---|
| Opens at its URL | Yes | Yes |
| In your Hub's post archive and post count | Yes | No |
| Earns its category a chip on your Hub | Yes | No |
| In your Hub's search, sitemap, and search engines | Yes | No (search engines are asked not to index it) |
| Can be sent as an email | Yes | Yes |
Use Unlisted for posts you want to hand out yourself: a members-only update, a page for one client, a draft you want a friend to read on the real site. Readers who get the link see the full post. Nobody browsing your Hub will stumble on it.
Unlisted only affects the web. Sending an unlisted post as an email works the same as any other post, and the email's Read online link still opens it. In the Library, an unlisted post keeps its Unlisted badge even after it's also gone out as an email.
Switching later
Once a post is live, the status pill beside its name is the switch. Choose Published or Unlisted to move between them instantly. Nothing is republished and the URL doesn't change. Choose Draft to take the post offline. You can do the same from a post's Status menu in the Library.
Updating a live post
Your edits save automatically, but the public page keeps showing the version you last published until you publish again. When you're ready, click Publish. On a live post, the button inside the popover reads Update.
The same goes for restoring an earlier draft from Version history: the live page doesn't change until you publish.
For a live post, the popover also shows:
- The live URL, with a button to copy it. The slug is locked once a post is live, so links you've already shared keep working.
- When it was last updated, and by whom.
- Its status: Published on your Hub with View in Hub, or Unlisted — hidden from your Hub.
- Move to draft, which takes the post off your site straight away.
Moving a post to draft doesn't touch its email history. A post you've already sent shows as Sent in the Library, and its reports stay in Insights.
Sending as an email
Click Send email in the top bar to open the send dialog, a fully separate step from Publish. It covers the subject line, preview text, sender, audience, A/B testing, and scheduling. See Sending Newsletters.
Sending email to your audience needs a card on file or a paid plan. The card isn't charged. It confirms you're a real sender. Publishing to the web never needs one. See Before your first send.
Posts that automations send
If an automation sends this post, a chip with the automation's name appears next to the post's name in the top bar. Click it to jump to the automation. If several automations send the post, the chip opens a list of them. In the Library, these posts carry an Automation badge.
Automated emails always use the latest saved version of the post. Fix a typo in the editor and the next person the automation reaches gets the corrected email. You don't need to publish first.
Sharing on social media
Turn a post into a ready-to-post share for Instagram, LinkedIn, X, Threads, Facebook, or WhatsApp. Open Share on social media from the top bar, or from the success screen after you send an email. When you first publish a post, the Your post is live message carries a row of networks. Tap one and the window opens already on it. (Until you've emailed your list once, that message offers Send to subscribers instead.) The window is marked Beta while it settles.
Pick where it's going
Choose a network along the top of the window. That's the only choice you make: Nashra sets the image format, the caption, and where the link goes. Instagram has two formats, Story and Post. Nashra remembers your last pick.
| Network | What you post | Where the link goes |
|---|---|---|
| Instagram Story | 1080×1920 story slides: a hook, your caption as a quote (once you've written one), and a closing slide | The link sticker |
| Instagram Post | A 1080×1350 carousel: a hook, your points, and a closing slide that points to your bio | Your bio, since captions don't link |
| Your whole post as text, under one cover image. Long posts are cut at a paragraph to fit LinkedIn's 3,000 characters | The end of the text | |
| X | Images and your caption | A reply to your post |
| Threads | Your caption and link. The link preview is the image | The post itself |
| Images and your caption | The first comment | |
| A message with your caption and link, which opens into your post's card | The message itself |
Every link is tagged with the network it was posted on, so your analytics show where readers came from.
Edit it on the preview
The preview shows the post the way that network will, and it's also where you edit. Click any text to edit: slide text right on the design, and the caption where the network shows it. The caption holds up to 140 characters.
- Instagram carousel — add slides, up to eight, or remove them. A slide you add but leave empty isn't posted.
- Look — Paper, Night, or Brand (your brand color). Slides use your brand fonts and flip for right-to-left languages.
- Draft with AI — writes the caption from your post, plus the carousel slides on an Instagram post. It uses one AI assist, and runs only when you click it. Once there's text, it becomes Redraft with AI.
Your caption and carousel are saved with the post, so they're waiting the next time you open the window.
Post it
The button reads Post on and the network's name (Send on WhatsApp for WhatsApp). One click copies what you'll paste, opens the network, and saves the images. The window then says what's left, such as pasting the text or adding your link in a reply. On X and Facebook, Copy link for the reply or Copy link for the comment hands you the link.
Instagram can only post from its app, so for Instagram the window shows a QR code instead: Scan with your phone. On any other network, click Post from your phone to do the same. The phone page walks you through that network: save the images, copy the caption, and put the link where it belongs. On an iPhone, the slides save through the share menu (Save Images). Elsewhere, they download. The page works for 24 hours. For an Instagram post, write the caption next to the QR code, and it travels to your phone with the slides.
Until the post is published, it has no link to share. The window reminds you: Publish the post to include its link.
On the Free and Newsletter plans, the slides carry a small Nashra badge. On Publisher it's off by default, and you can switch Nashra badge back on if you'd like to show support.
Drafts
Every post starts as a draft and saves automatically as you write, including when you leave the editor mid-sentence. Find your drafts in the Library under Posts.
Clicking New post opens an editor with nothing saved yet. Nashra only creates the post in your Library once you make a real edit, like a title or any content. Close an empty editor without typing anything, and nothing is left behind.
Post status at a glance
A post has two separate states, one for the web and one for email:
| Web (the status pill) | What it means |
|---|---|
| Draft | Not on your site. Only you and your team can see it |
| Published | Live at its URL and listed on your Hub |
| Unlisted | Live at its URL, hidden from your Hub and search engines |
| Email (the badge) | What it means |
|---|---|
| Scheduled | An email send is queued for a future time |
| Sent | Delivered to your list. A delivered email can't be unsent |
A post can be both, like Published and Sent. In the Library, a post that went out by email shows as Sent even if it's also on your site.
Duplicating a post
In the Library, open a post's ⋯ menu and choose Duplicate. The copy opens in the editor right away, ready to reuse for a recurring format or a templated announcement.