Create a Webinar
How to run a webinar or live session with the Event template: name, cover, date and join link, booking, the four automatic emails, calendar invites, personal join links, adding the recording afterwards, the Booked, Attended and Missed groups, changing the time, cancelling, and how events show on your Hub.
How it works
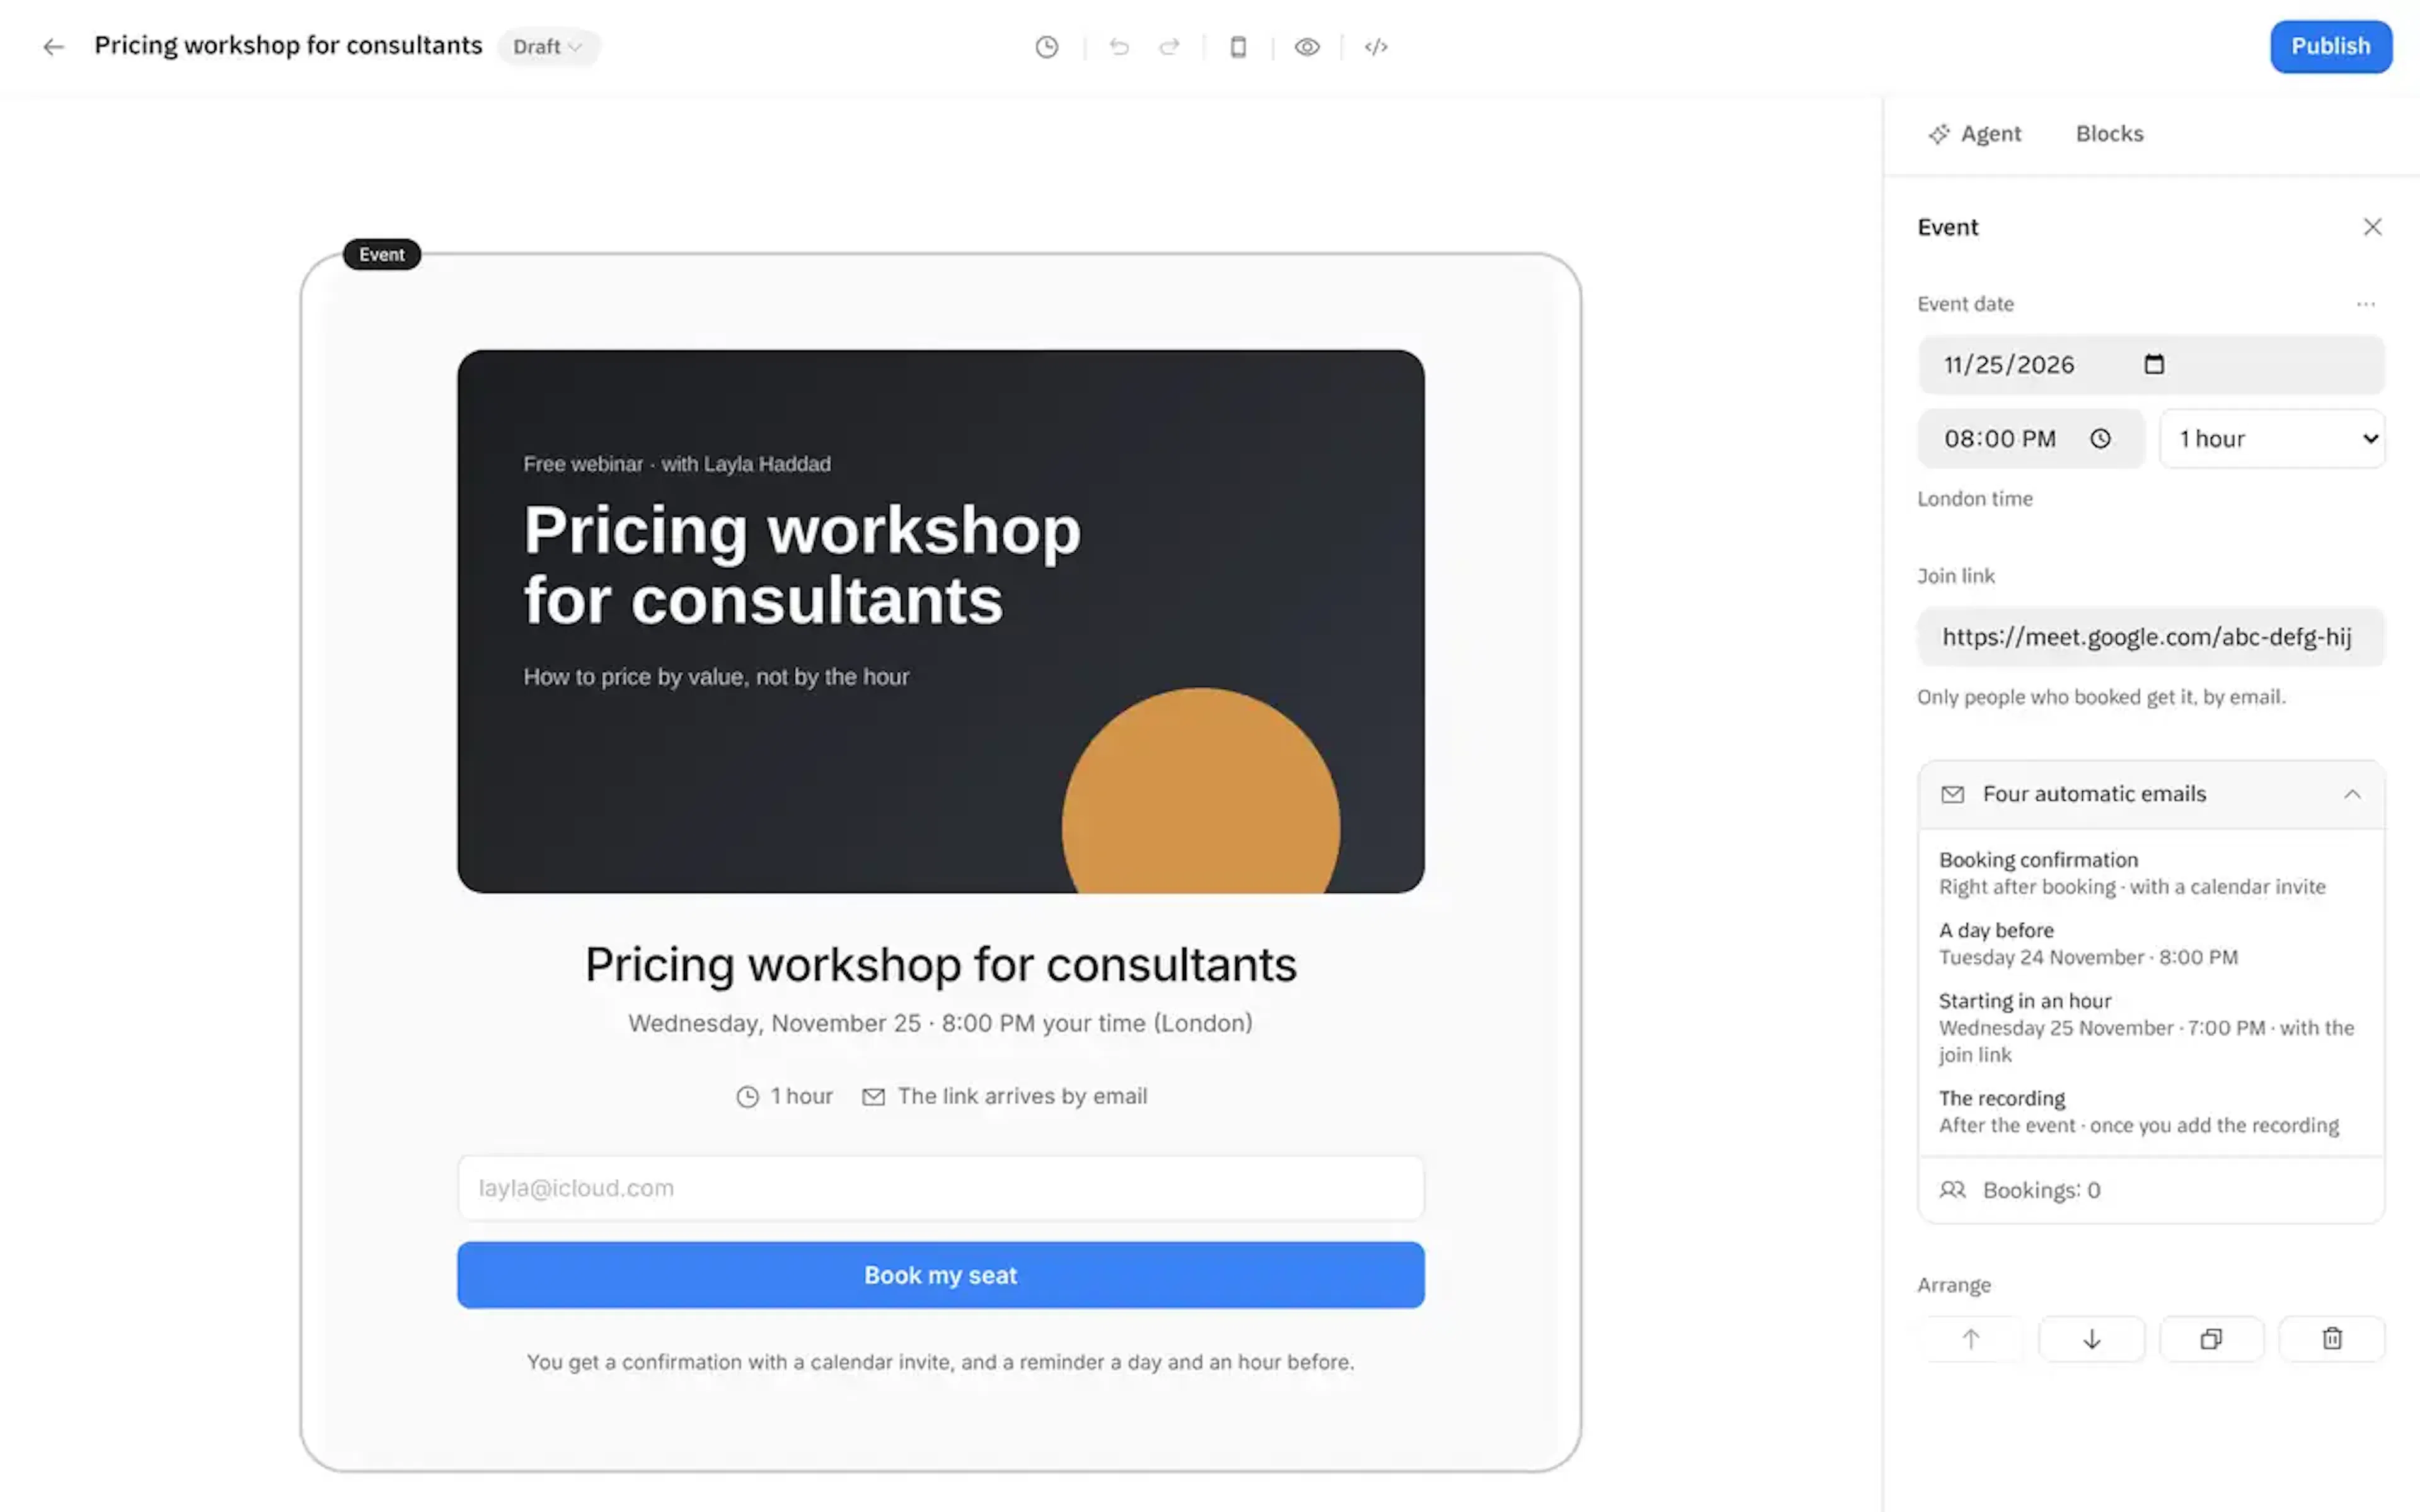
An event page is a landing page with an Event section on it. That one section is the whole event: it shows the cover, name and date, and it holds the booking form.
Once you set a date and publish, Nashra does the rest for you:
- Sends a booking confirmation with a calendar invite.
- Reminds everyone a day before and an hour before.
- Gives each person their own join link, so you know who came.
- Sends the recording to everyone who booked, once you add it.
You don't write any of these emails or set up an automation.
Create your webinar
Start from the Event template
In Library, click Create → Landing page, then choose Event.
Name your event
Click the title on the Event section and type the name. The same name is used in every email, the calendar invite, and the audience groups.
Add a cover
Click the cover area to upload an image. It shows on the page, at the top of the emails, and when the page is shared.
Set the date and time
Click the Event section. In the settings on the right, pick the Date, the Time and the Duration. The time is in your workspace's time zone, from Settings → General. Each visitor sees it in their own time.
Paste the join link
Paste your Zoom, Google Meet or other meeting link in Join link. It is never shown on the page. Only people who booked get it, by email.
Fill in the rest of the page
The template adds a What you will take away section and an About you section. Replace the sample text with your own. Publish warns you if any sample text is still on the page.
Publish
Click Publish. The page is set as an Event, so it also shows in your Hub's Events section.
Set the date before you share the page. Until there is a date, visitors see "Date coming soon" and can leave their email to hear when it's set.
What your visitors see
Visitors enter their email and click Book my seat. If you use double opt-in, they first confirm their email with Confirm my seat, then the booking confirmation arrives.
The section changes on its own as the event goes on:
| When | What the page shows |
|---|---|
| Before the event | The date in the visitor's time zone, and Book my seat |
| While it's live | Live now, and booking sends the link straight away |
| After it ends | Watch the recording once you add it. Visitors enter their email and it opens on the page |
| Cancelled | This event is cancelled, and a form to hear about the next one |
Everyone who books also joins your audience as a subscriber.
The four automatic emails
Click the Event section and open Four automatic emails to see when each one goes out:
| When it goes out | |
|---|---|
| Booking confirmation | Right after booking, with a calendar invite |
| A day before | 24 hours before the start |
| Starting in an hour | An hour before, with the join link |
| The recording | After the event, once you add the recording |
The emails are written for you, in your workspace language. People who book late only get the emails still ahead of them. Someone who books in the last hour gets the join link with their confirmation.
Calendar invites
The confirmation email has an invite file and buttons for Google Calendar, Apple Calendar and Outlook. If you change the time later, the new invite replaces the old one in their calendar. If you cancel, it's removed.
Join links
Each person gets their own join link by email. It takes them to your meeting link, which means:
- You can change the meeting link anytime. Their link always opens the current one, and nobody gets an extra email.
- You know who came. Opening the link around the event time counts as attending.
- Nobody gets in too early. The link opens the room from 30 minutes before the start. Before that, it takes them to your page, which tells them when to come back.
After the event: add the recording
Open the event
Open the event page in Library and click the Event section. If you haven't added the recording 12 hours after the event ends, Nashra emails you a reminder with an Add the recording button.
Paste the recording link
Under The recording, paste a YouTube, Vimeo or Google Drive link.
Everyone who booked then gets The recording is ready by email, and the section on your page turns into Watch the recording.
See who booked and who came
For every event, Nashra makes three smart groups in Audience → Segments:
- Booked: everyone who booked a seat.
- Attended: people who opened their join link.
- Missed: people who booked but never joined.
Click Bookings in the event settings to open the Booked group. After the event, the settings also show how many of the people who booked attended. Send a post to any of these groups like any other segment, for example a thank-you to those who came, or the recording to those who missed it.
Change the time or cancel
Change the time: pick a new date or time in the event settings. If people have already booked, Nashra asks first. Choose Change and tell them, and everyone gets one email with the new time and a calendar invite that replaces the old one. The reminders move with it.
Cancel: open the ⋯ menu next to Date and choose Cancel the event, then Cancel and tell them. Everyone who booked gets a cancellation that removes the event from their calendar, the reminders stop, and the page says the event is cancelled.
Cancelling can't be undone.
Events on your Hub
Published event pages show in your Hub's Events section, with the cover and the date. Upcoming events show Book your seat, a live one shows Live now, and past ones show Watch the recording once you add it. See The Hub.